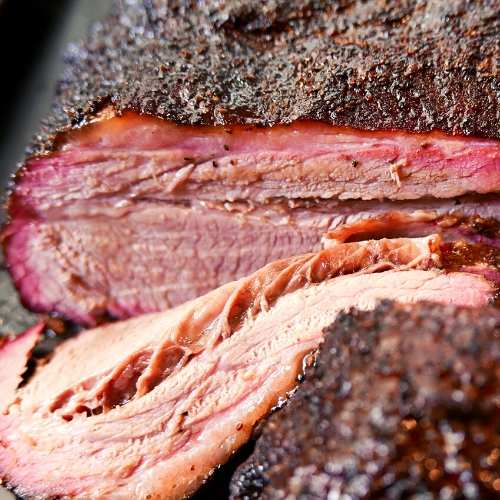
When done correctly, brisket will deliver this amazing experience of having meat that is tender, sliceable, and juicy all at the same time.
Now, it is completely understandable that this cut can seem scary at first. After all, briskets are usually large (and expensive) cuts. They are tough meat since they come from an area of the cow with a lot of strong muscles and connective tissues. As a result, you have to cook it correctly for a long time, which can also be intimidating.
None of the points above are false, but they don’t have to stop you. We admit the process will take time, patience, and some practice, but if you follow this guide, the results will be worth it. We’ve studied and tested many methods to make sure this guide includes everything you need.
If you are ready for the challenge, we´ll show you our 7 steps method to make a fantastic Texas-style smoked brisket.
Method for Texas Style Smoked Brisket
Anatomy of Brisket
Before starting on the method, it is important to understand a little bit the anatomy of brisket. To begin with, briskets are the pectoral muscles of cows that cover the “chest” area.
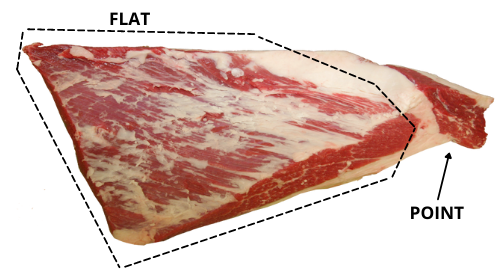
As you can see in the image, the whole brisket consists of two different muscles:
- The Flat is the “bottom” part of the brisket. This cut is usually lean and doesn’t have too much fat.
- The Point is the “upper” part. This is the opposite of the flat, as it contains much more fat and less meat.
The flat and the point overlap each other, and their grains run in different directions. This will be important when we slice it.
Cooking Method
From the very start, it is important to note that we will be cooking by temperature and not by time. As with much of our guides, we will provide you with a method for cooking rather than an exact recipe. So feel free to adjust our steps according to your tastes and experience. Before you start, be sure to have:
- A smoker that can hold the temperature to 225 degrees F
- A meat thermometer
- Pink butcher paper
- Good cutting and slicing knives
For smoking brisket, there are 7 main steps in the method:
- Selecting your cut
The type of meat you chose for this smoked brisket will have a big impact on your result. The quality of the meat will vary of some important factors:
- Marbling. One term you will hear a lot is marbling. This is the name of the internal fat that meat has. The more marbling, the more taste, and juiciness your meat will have, so look for cuts with a lot of marbling.
- Grade. You also need to pay attention to the grades of beef. These vary according to marbling and the maturity of the animal. The grades are usually Select, Choice, or Prime. If possible, avoid Select. Prime is the best, but Choice will deliver great taste too.
- Maturity. The best cuts are wet-aged somewhere between 28 to 45 days in the vacuum bag. This time allows the enzymes within muscles to tenderize the meat. So when you buy your cut, look at the packing date and “age” your meat in the fridge.
If you want to learn more, check out this post from the Texas A&M University: USDA Beef Quality and Yield Grades
An important question is how much meat to buy. You will notice the cut has plenty of fat, so you´ll have to trim a lot of it down. As a guide, try to buy at least 1/2 to 1 pound of uncooked brisket per person.
If possible, you want to buy a whole brisket (flat and point) to cook together. The reason is that the fat from the point juices the flat´s lean meat, so the end product will be better. However, one whole brisket might be too much. So if you have to choose, always go point over flat.
- Trimming
The goals of trimming are simple:
- Clean your cut from all the “hard fat” that won’t render in the smoking process
- Get rid of the fat and silverskin (the white film on meat) that will interfere from directly seasoning the meat
- Make your brisket look more appealing to the eye
Here’s a quick guide on how to trim your brisket:
- Start by having a cold brisket. This will make it easier to cut the fat.
- Lay the brisket fat cap down. Use your cutting knife to trim all the excess fat on the top such as silverskin or big lumps of fat.
- On one side, you´ll notice a big chunk of fat. Remove it.
- Run your knife across each side to trim the edge brisket. Aim to cut about 1/4 on an inch. After this point, you´ll be able to see the division between flat and point.
- Flip the meat, fat cap up. Some people don’t like to trim too much this side, but we like to leave only 1/4 inch of fat on and trim the rest. How to do this?
- After you trim the sides, you´ll have a clear view of the layer of fat on top of the meat.
- Slowly start to trim this excess off. It is perfectly fine to do this in several cuts. No need to trim off all at once (we are not in a competition). Better to be slow than to trim too much off.
- Don’t worry if you accidentally cut into the meat. If you do, stop and don’t finish that cut. Let the fat hang on top to not leave the meat exposed.
- You´ll notice there is something like a flap coming out of the point. Cut it off in line with the rest of your brisket.
- With the fat side trimmed, you´ll notice another big chunk of fat below where the flap was. This will be right between flap and point. Clean this too.
If you selected a 12-15 pound brisket, by the end of your trimming you might have removed up to 4 pounds of fat. Don’t worry, this is normal.
- Seasoning
The next step is to season your brisket. As always, use your favorite rub recipe. If you don’t have one, try this one:
- 3 tbsp garlic powder
- 3 tbsp onion powder
- 3 tbsp paprika
- 3 tbsp chile powder
- 1/2 cup coarse sea salt
- 1/2 cup coarse ground black pepper
- Optional (add 3 Tablespoons of brown sugar if you want a sweeter twist)
This amount of rub should be more than enough for a brisket between 12 to 15 pounds. You don’t have to use it all. Be generous while seasoning, but don’t abuse.
As with several methods for smoking meat, you can choose to use a binder or not before applying the rub. The most common ones to use are yellow mustard or apple juice. Our recommendation is to try first without and then test other versions.
Instead of using a binder, you can apply the rub and let it rest for some time (30-60 minutes in the fridge). This will make sure the rub adheres to the meat. Applying the rub with time will also allow the salt to penetrate the meat deeply, which will be good for the taste. Leaving the rub for longer (8-12 hours) will create even more of a protective coating. This will help keep the meat juicy while smoking and create a better bark. So our recommendation is to trim at night, rub the brisket and leave it overnight in the fridge.
- Smoking
Finally, it is time to start smoking. In this first part, the goal will be to add wood smoke flavor to the meat and to create a nice bark. Here’s where we will create the famous smoke ring which will be visible when you slice the brisket.
Set your smoker to 225 F using indirect heat. As you’ll see, cooking brisket is a long process. To speed it up, you can try setting it to 250F or even 275 F. There’s no perfect formula. Just keep an eye on the internal temp of your brisket as we’ll describe below.
Before smoking, some inject the meat with beef broth using a hypodermic syringe. The goal is to add extra moisture to avoid the meat from dehydrating. Having said this, if you have a good cut of meat with decent marbling, this shouldn’t be a problem.
Some others like to spritz the meat with apple juice during this smoking period. In our experience, this is not needed. Again, with good marbling, the meat won’t dehydrate.
One good question is whether to smoke with the fat cap up or down. Opinions vary here. We haven’t seen much difference in the practice, but there are good points for cooking fat cap down:
- Better flavor: You might think that cooking fat side up will melt the fat into the meat. However, this is not true. Instead, you can risk the melting fat to wash away the seasoning. We don’t want this.
- Better presentation: Cooking fat cap down will produce a more uniform bark. So your brisket will look better this way too.
After 6 or 7 hours of cooking, start measuring the internal temperature of your brisket. Take the measurements in the middle of the flat and the middle of the point. Watch out not to take the temperature in the fat pocket between the point and the flat. Usually, around the 8th hour, the temperature will reach 165 F. It is at this point when we can take off the brisket. Note again that we cook by temperature, not time.
At some point between 145 F to 175 F you might notice the temperature to stop rising, or even decrease slightly. This is called The Stall. The Stall happens as the liquids evaporating from the brisket will start to cool it. Don’t worry, this is normal. Be patient. Eventually, the temperature will start rising again.
- Wrapping
The next step is to wrap the brisket to speed up the cooking process and render the fat. This is often called The Texas Crutch. To avoid the Stall and cut down cooking times, some like to start wrapping at 150 F. We prefer being patient. We find this creates a thicker bark.
To start wrapping, lay your brisket on top of a large piece of pink butcher paper. Depending on your cut’s size, you might need to overlay 2 pieces. Then, fold it tightly.
In this step, you can use foil instead of pink butcher paper. The latter is more breathable, so it lets the meat get more of the smoke taste. Foil will cook perfectly fine too. The only downside is that you can lose some bark that adheres to the foil.
Similar to injecting the meat or spritzing it, some add beef broth during this wrapping step. As with the previous, if you have good quality meat there is no need for this in our opinion.
Continue the smoking process at 225 F for another 5-8 hours. After the 5th hour, keep checking the internal temperature until you reach 205 F.
At this point, your brisket is finally cooked!
Cooking by temperature is the easiest and safest way to proceed. However, some expert tests are worth noting:
- The Jiggle Test: Grab your brisket from one and jiggle it. If it is done, you will see it shake through the other end. If you’ve never done this, try it and you’ll be able to see what it means. It is kind of fun to see.
- The Bend Test: Grab your brisket by both ends and lift it. If it is done, you will see it bend easily in the middle.
However, to apply these methods, you’ll probably have to practice with a few BBQs beforehand.
- Resting
We understand that after 13 to 16 hours of smoking, you might want to start eating right away, but don’t. We can’t overstress the importance of resting your brisket before slicing. Resting is necessary for all juices to redistribute and settle within the meat. If you cut right away, you´ll see all the precious juices just spill on your cutting board. So you’ve been patient long enough, just wait a little longer. It will be worth it.
As a minimum, rest your meat for 1 hour. If you have the time, wrap the brisket in towels and put it in a cooler without ice for 2-4 hours. The cooler won’t allow the brisket to cool, but the benefits of resting will take place.
- Slicing
When you are ready to serve, it’s finally time to slice your brisket.
Some important tips before starting:
- Don’t start slicing until you are ready to serve, as the brisket will dry rapidly.
- Be careful when cutting, as the juices and fat could make the surfaces slippery.
- Try to have your weak hand just for holding the meat and your strong hand for cutting. This way, you won’t have a slippery knife.
- Remember that we have two overlapping muscles with different grain directions. As a general rule of thumb, we should always slice against the grain.
For the traditional Texas technique for slicing, follow this guide:
- Fat cap down, find the point where the point meets the flat. Cut the brisket at this point to have 2 parts.
- Focusing on flat, start cutting in that same direction (against the flat’s grain) aiming for 1/4 inch slices.
- Back to the point, recall that the grain runs in a different direction. So turn the cut 90 degrees to start cutting. This means that your new cutting direction will be perpendicular to the first cut you made. Continue to slice aiming too for 1/4 inch slices.
As an alternative, you can separate flat and point before slicing. This will allow you to focus on each cut separately and always going against the grain. The downside here is that you’ll have some pieces with no bark on top. Again, take your choice.
The Bottom Line
If you follow this method, you´ll be able to enjoy a delicious Texas-style smoked brisket. By now you´ll know it won’t be a quick process, but the results are worth the long journey.
As we always say, our methods are only guides for you to add your creativeness and preferences. Once you’ve tried it, play yourself with it! Don’t be scared of trying different variations to find your perfect variation.
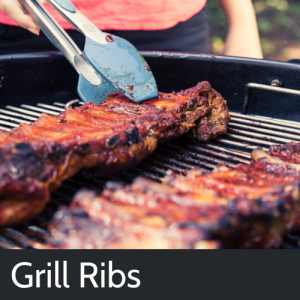
If you are looking for more alternatives for your next Sunday Grill, check out our Guide on How to Grill Ribs.